


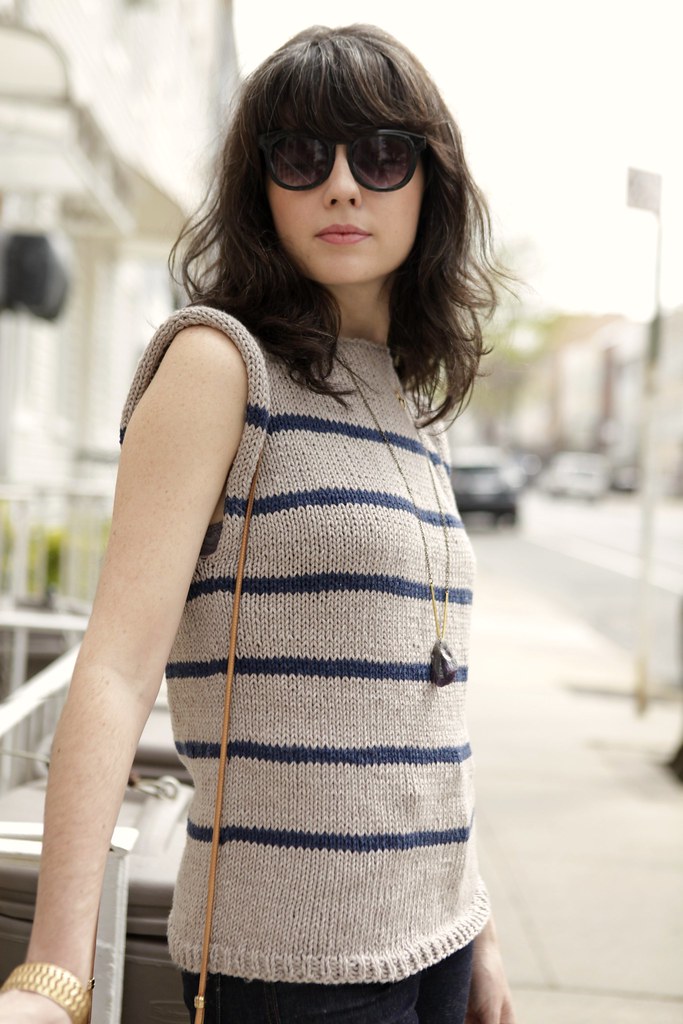
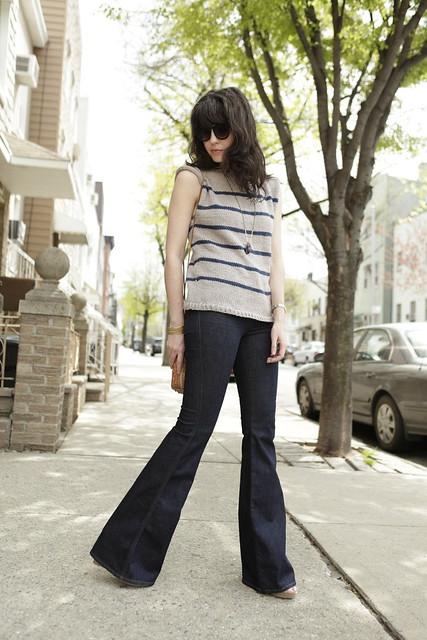
Striped Sweater Pattern
Size
- 18.5" measured flat across the widest part of the shoulders
- 17.75" measured flat across the hips
Materials
- Size 9 needles - 32” circular
- Knit Picks Simply Cotton Worsted yarn in Camel Heather - 2.5 skeins (color A)
- Knit Picks Simply Cotton Worsted yarn in Prussian Heather - 1 skein (color B)
- 2 stitch markers
- scrap yarn or stitch holder
Gauge
- Blocked Gauge: 4” = 13.67 sts, 22.5 rows
- Unblocked Gauge: 4” = 15.67 sts, 20.83 rows
Stockinette Stitch
- In the round:
- Flat:
WS - purl row
Notes
The sweater is knit from the bottom up in the round, until the bottom of the arm opening. Then the front and back are split, with the back stitches put on a stitch holder (or scrap yarn) while the front is worked flat. Then the back is worked flat. Then the shoulder seams are bound off together with a 3 needle bind off, leaving the center stitches bound off separately. No seaming necessary!Stripes In general there are 12 rows of color A (tan) and 3 rows of color B (blue). However, at the top and bottom of the sweater, a set of blue stripes are skipped to give a wider chunk of color A (tan). So, when you cast on, you’ll actually knit 24 rows of color A before switching to color B. Then, continue in 12 color A to 3 color B pattern until you start nearing the top of the shoulder, where you’ll skip the last color B stripe.
Modifications This sweater can easily be modified to make it larger or smaller. All you need to do is change the number of stitches you cast on in the beginning, then follow the rest of the pattern as is. To determine how many stitches to cast on, you'll need to know how many total inches all the way around you want your sweater to be (i.e. 40 inches) and your gauge (i.e. 4" = 16sts). (Note: Your gauge can differ from mine if you're determining your own number of cast on stitches).
First, calculate your gauge per 1", by dividing your Number of Sts by Number of Inches. (i.e. 16/4 = 4 sts per 1")
Next, multiply your gauge per 1" (the number you just calculated) x your target sweater size (i.e. 4 x 40 = 160sts).
Last, If your number is an odd number, round to the nearest even number. (You want an even number of stitches so your back and front of the sweater are identical). That's it!
Techniques Used
- increases - make 1 (left and right slanting). see knittinghelp.com for great instruction on increases
- 3 needle bind off. see knitty for instructions
- jogless stripes - stationary method of joining colors for jogless stripes. a great overview is at techknitting
Pattern
BOTTOMCO 138 sts in color A, join to knit in the round, being careful not to twist stitches.
Place marker between first/last st (PM1) and between sts 69/70 (PM2)
Round 1-4 - *K1, P1, repeat from * across row
Round 5-76 - knit in stockinette st (add or decrease # of rounds here if you want to make it longer or shorter)
At the same time, switch colors for the stripes. The first 24 rows are worked in color A, then 3 rows of color B. Afterwards, work 12 rows in color A then 3 of color B.
Round 77 (round 5 of color A) - increase row: slip M, k1, m1R, knit to 1 st before next marker, m1L, k1, SM, k1, m1R, knit to 1 st before M, m1L, k1 (142 sts)
round 78 (round 6 of color A) - knit
Split front and back
Next row - (row 7 of color A) - knit from first to 2nd marker (this will be your front - 71 sts); place all sts from 2nd M to end of round on a stitch holder (this will be your sweater back - 71 sts).
FRONT
row 2 - purl row (keeping in stockinette st worked flat)
row 3 (row 9 of color A) - increase row - k1, m1R, knit to 1 st before last st, m1L, k1 (73 sts)
row 4 - purl
row 5 - knit
row 6 - purl
row 7 - (row 1 of color B) - increase row - k1, m1R, knit to 1 st before last st, m1L, k1 (75 sts)
row 8-46 - work in stockinette stitch flat
(This will be about 9 inches from the split in the underarm seam.)
This covers 2 more blue stripes, but skip the last set of blue stripes.
Put sts on holder
(Note - after the split, when switching colors, when switching back to color A, if you’re on a circular needle, slide your sts over to the other side of the needle so you don’t have to break your color A yarn…you can just carry it up…but just make sure you continue working in stockinette st). if this confuses you - just skip this trick and switch colors like normal :)
BACK
add sts of back from holder to needles, positioning needles to start with the KNIT row. setup row 1- knit this row.
follow instructions for FRONT.
SHOULDER & BIND OFF
Use 3 needle bind off for the first 19 sts to create a should seam. Bind off middle 38 sts in opposite of stockinette st. Bind off remaining 19 sts in 3 needle bind off for other shoulder seam.
Weave in loose ends and block sweater.
Abbreviations
- CO = cast on
- K = knit
- P = purl
- PM = place marker
- M = marker
- SM (or slip M) = slip marker (from your left needle to your right)
- M1L = make 1 left-slanting (a type of increase)
- M1R = make 1 right-slanting (a type of increase)

21 comments:
it's adorable! love it! thanks for writing up the pattern, too!
:) Beth
Oh, wow! I love it and love the name! It looks so stylish on you.
oh my! this is incredible! thankyou for the pattern. lordy knows when i'll have the time to do a project like this but when i do - THIS IS IT! hopefully i look as good as you do in it.....
L O V E
This is so cute!! Inspired me to loo at a summer knit! Thank you for the pattern too!!!
Jess
I absolutely love this! What would say the finished measurements are one this garment?
This outfit is stunning. Love that sweater you made I can't believe you did that it's gorgeous!!
Fashionable Collections
I love this! In fact, I've decided to make it my first knitted sweater :). I ordered some gorgeous yarn from Knitpicks today, and I hope to start it soon. Thank you so much! By the way, I love all of your jewelry. It's fabulous!
-Kaitlyn
Thank you so much - this is exactly what I have been seeking.
Stefanie-
I have a quick question about the pattern. Did you do any increase or decrease rows to make it longer/shorter? Also, when knitting flat and changing colors you say "slide your sts over to the other side of the needle so you don’t have to break your color A yarn," I guess I'm having trouble visualizing it, but would it be bad to break the yarn and just start up again instead of carrying it up? I apologize for the borage of questions, but I've never knit a sweater before and I want to make sure I get it right :). Thank you so much! - Kaitlyn
hi kaitie! re making it longer/shorter: this is the pattern i generated from the sweater i made, so this is *exactly* how the stitches, length, increases i used.
as for color switching, sure you could break your yarn. no harm in that at all! the only downside is that you're going to have lots more ends to weave in. i was just avoiding that. it might be easier once you get to that section, to understand what i mean....but basically you finish your 3rd color row and it's time to switch colors - and since i was using a circular needle, i just slid my stitches across to the other end of the needle, and my new color was over there hanging out, ready to be knitted (no yarn breaks and less ends to weave!).
let me know if you have any other questions!
This is totally gorgeous! Thanks so much for posting the pattern!
--Beth, www.ChiCrochet.com
Lovely!!
Thank you for the pattern, it is so cute. I read it 5 times and could not find a reference to the size. I can see that the pattern is written in one size, can you please tell me what size it is so I can figure out if I need to adjust it for my granddaught. Thank you so much.
I am not familiar with the letters: M1R, SM and M1L..can you tell me what they mean?
Yes! sorry about that - the m1's are types of increases, left and right slanting. you can find videos and descriptions here: http://www.knittinghelp.com/videos/increases
m1L = make 1 left slanting
m1R = make 1 right slanting
SM is for "slip marker". it just means to move the marker from the your left needle to your right.
This sweater is really what I have
looking for. But I would need to
make it bigger. Could you tell me
how to figure it out?
Hi Sheila - So I just added "Modification" instructions above under Notes. Hope this helps! It should be really easy to adapt.
hi this is completely adorable!
i have one question. what do you mean by binding of middle 38 in opposite of stockinette stitch?
thanks!
This sweater is so very cute and I think the perfect project for spring! I think this just might be my next project :) Thanks for sharing your pattern!
Post a Comment