
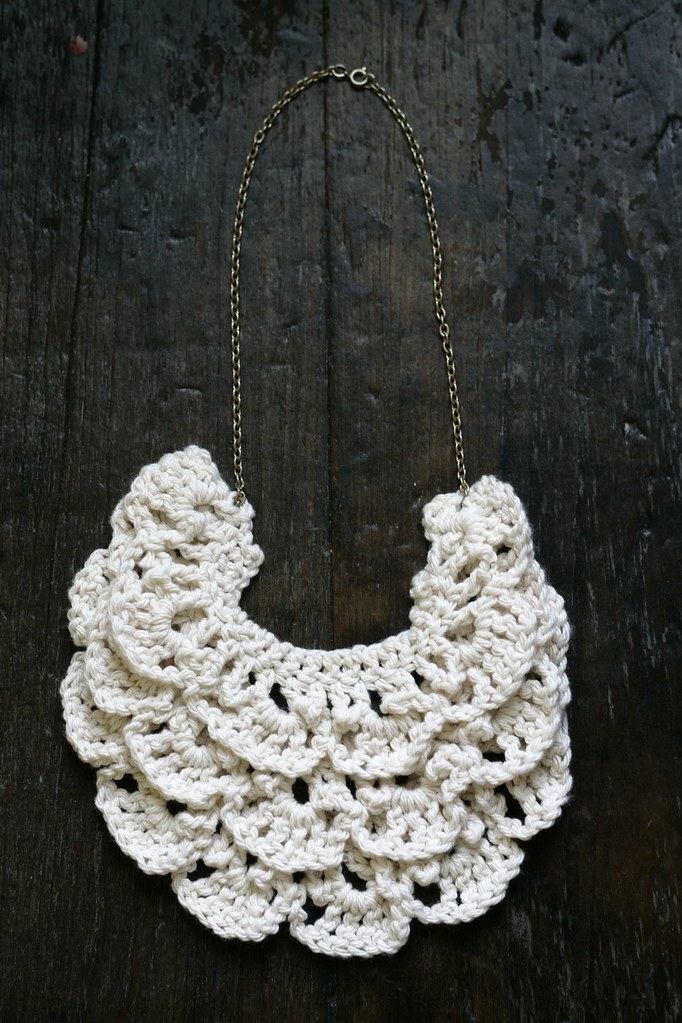
Finally! here's the pattern for the crochet bib necklace. all of the details for making the necklace yourself are below. however, if you're not so inclined to make your own, you can always buy a crochet bib necklace from the shop.
Materials: I used Peaches & Creme cotton solids and a size G hook, but you could pretty much use yarn/hook size to get whichever size you prefer.
C= chain
SC= single crochet
DC= double crochet
TC= triple crochet
Chain 33 sts
row 1: DC into third stitch from hook, DC across row.
row 2: C3, turn, DC into first st, *chain 3, DC into next st, repeat from * across the row.
row 3: C3, turn, DC into first st, then in loop created from previous row (TC, C1, TC, TC, C1, TC), * C3 skip 1 loop, SC into next loop, C3, skip 1 loop, in next loop (TC, C1, TC, TC, C1, TC). Continue from * to the end of the row. DC into remaining st. Bind off.
Repeat for next layer only chaining 29 stitches for the foundation row.
Repeat for next later only chaining 25 stitches for the foundation row.
Stitch all three together, staggering the placement to get a layered effect. To do this, place the biggest piece on bottom and attach the middle piece 1 scallop above the top edges of the bottom piece. only stitch in 2 places (at the very tops of the 'horseshoes' or U's). Next, lay your smallest piece on top of the middle piece, 1 scallop above the top. Stitch the same way as before. Finally, attach to a chain. you’re done!
Note: this pattern can be easily modified if you're using bigger or smaller yarn. To make longer or shorter pieces, just increase or decrease your initial chains in increments of 4.
**Pattern is for personal use only - not to be reproduced for sale, nor to make items for sale**
48 comments:
I love this. LOVE IT. I hope I can pick up some crochet needles and start.
Thank you so much!
ann
STunning work...I keep saying to everyone that I'd love to learn how to crochet...but perhaps I'll just leave it up to you guys with the expertise!
Thanks for passing by this morning.
Have a good weekend!
Char
okay, I SERIOUSLY Think I have to have that necklass. I love it!!!
amy :)
@amyandann - you can definitely do it. crochet is easy! if you try it...let me know how it turns out.
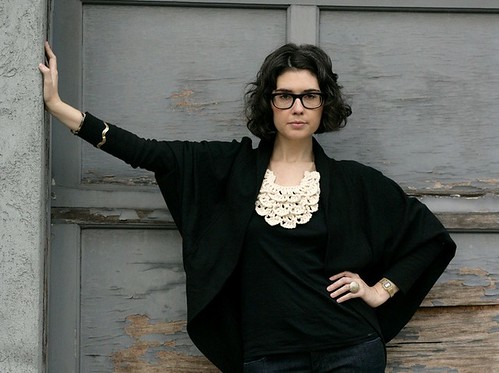
Wow, you and the ruffled necklace are a stunning pair!
pve
LOVE this sooo much...it's feminine, sexy and glam, sweet & sassy--all at once! This is a great way to stretch my novice crochet skills. Thank you so much for sharing the pattern with us! :o) Have a great weekend!
ooooo! That is awesome! I'm normally not a ruffle, girly person but this has a great balance to it. I may have to remember how to crochet now ^.^
this is so wonderful! this is going to be my motivation to properly learn how to crochet.
I am definitely learning to crochet so I can make this necklace.
Working on this now and loving! Did you sew the pieces to the bottom of the previous piece? Thanks for sharing the pattern!
This is a lovely pattern! I made one for a friend as a Hanukkah present. :p
Thank you for sharing. (:
I really love this pattern. This is the first time I tried to crochet and it seems pretty easy, but still every time I'm not satisfied so I start all over again. I tried different ways of doing it. The thing I'm most in doubt of is row 2: am I using my chain stitches or the stitches I made in row 1?
If I use the chain stitches row 3 will be totally bumpy.
If I do it the other way it will be too small.
I really think it is fun to crochet, but what can a do to get a perfect result?
Susanne
Susanne, From looking at the photo, it seems to be somewhat bumpy.
Perhaps you could try blocking it. And trying to block that lump out.
I would use a mild blocking effect.
On this pattern, I would also make it more of a dicky. (That is just my preference.)
If you do not know about blocking, you can google 'crochet blocking techniques'.
I would like to try this in yarn, a nice cotton yarn or a silk/blend. And then if I were going to make an actual necklace, I would use cotton thread.
Finally, for the designer, thank you so much for the pattern. I am going to save it, and it will be on the list of things to start, after I get about 8 of the 17 'on the hook' projects I have going right now.
This would be great on Ravelry, if you are not a part of that site yet. Well even if you are a part of it.
One of your other necklaces was featured on the "Pattern of the Day." http://www.dailycrocheter.com/day_missed.php
And I saw this pattern and I love it, it has just enough delicateness to be finished in just about any thread or yarn.
For those that have long enough hair, this would also make a great front only scarf for the colder months. Using it when a jacket looks better a tad bit open. Of course it could then be used the rest of the day as a necklace or dicky.
This is so great. I absolutely love it -- thanks for sharing.
Just found this pattern on Ravelry and think I might have to give it a try. I'm supposed to wear something "summery" to a bridal shower tea-part tomorrow and this necklace might be just the thing. Thanks for sharing the pattern!
-Jayna
JJCrochet
Superb design work. i love it much.
I hardly ever crochet so I am having a few issues (I normally knit). The different layers try to curl up a lot (like more of a circle than a half circle) also it is really bumpy. I used cheapo red heart super saver, could that be the problem? Also is blocking crochet stuff the same as knitted?
hi there -- i block crochet the same way i would knitting. i use cotton yarn for this, and so i steam it and steam it. if you're using red heart acrylic, then you probably don't want to steam it (it will turn very limp). instead, you might want to stretch it out, pin it, and mist it, then let it dry for a few hours. that may help with the curling. good luck!
susanne,
for row 2, you do your double crochets into your previous row...so your previous DC's. hope this helps!
stefanie
I love love love this piece. Great idea, I'm making one asap!
I can crochet best from a graph, and I am having a difficult time trying to understand row 3. Any way you can create a graph for this? Thanks.
hi - sorry, the pattern is only available in text form. good luck - and let me know if you have any specific questions that i can help with.
Thank you for sharing this pattern... I absolutely LOVE IT!! I also rolled the finish project and it looked like this
I've also been thinking of sewing a few of the necklace pieces together to make a matching bracelet!
oh my gosh, sekar, i LOVE what you did to make the little pendant! that is so adorable.....and a bracelet is such a good idea!
just loved making this and made with several different embellishments...thanks for sharing the pattern. :) Debb I linked to you
beautiful pattern! It took me about 2 hours to make it (I'm still kinda new =)
I am in love with this necklace & am working on it now, just curious how you achieved the layered look?
Hi KS - Thanks! You mean how each layered is staggered? I just attached each layer 1 scallop down from the previous layer. Hope this helps!
Why don't you want anyone to make and sell the finish product?
Hi Anonymous,
Thanks for visiting! So, all of my patterns are free for personal use, but not to be sold, nor the products made from them sold. If you'd like to buy a finished one, you can visit my shop. Thanks!
Stefanie
I hope it's ok, I do "Tutorial Tuesday" on my blog and used this blog. You have full credit. I love it so much, and wanted to share. Thanks!!
Hi there The Conners! Sure - all I ask is that you provide a link back to my pattern. Thanks so much - and your blog is adorable!! Stefanie
Hi Jane! Of course - and thank you!!
Stefanie
Absolutely love this stylish pattern. So thank you so much for the chance to try out my skills with crochet. And if I am lucky it might even resemble your beautiful work. Best wishes. miranboo.
Gorgeous! Thanks!
Can you tell me what the abbreviation C1 means? Is it the same as single crochet?
Sarah
I really want to make this necklace, but I don't have any experience with jewelry making. Before I begin the project I want to understand how the chain is attached.
Can you post brief instructions?
Thank you so much!
@sarah, C= chain
@chloe - sure, so i used chain, 4 jumprings and a lobster claw clasp (all things you can get at michaels). you'll also need wire cutters (to cut your chain) and 2 sets of pliers (to attach your jumprings). i cut 2 pieces of 7.5" chain, attached the chain with the jumprings on either side of the U shape of the necklace....then added the lobster clasp at the other end of the chain.
Thank you for this awesome pattern Stefanie, I made the necklace this week, just blogged about it here http://domesticblissnz.blogspot.com/2011/07/my-creative-space-crochet-necklaces.html
From Megan in NZ
Love, love, love.
I'm adding it as a bib for a recon tank top I'm working on.
Why am I having such trouble doing this? I keep ending up with the wrong number of loops after row 2.
At the beginning of row 2 it says: C3, turn, DC into first st. But this doesn't create a big loop like all the others on this row which are all: chain 3, DC into next st. For that to work it would have to be chain 6, turn, DC into first st.
Also am I DC-ing into the first stitch of the row i.e. the top of the last DC of the last row?
Why can't I do this?
So I'm just curious, do you have a copyright on this product?
I am soooo excited... I can hardly wait to start... Very AUSTEN-tatious!
I will be linking you from my blog...
Me encanta tu blog, he hecho el collar-babero para mi hija y está encantada. Siento no hablar inglés pero para eso está el traductor de Google, espero que leas esto.
Te invito a que veas mi blog
www.laspasionesdemorgana.wordpress.com. Saludos. Marian.
Hi, I struggled with the same thing and was able to fix it by DCing in the second stitch at the start of row 2 (instead of the first stitch you mention). This way it will end with the right number of loops at the end of row 3 and finish with a DC in that smaller first loop of row 2. Please let me know if this isn't clear
I'm making this necklace for a gift, and I'm wondering where I can get the necklace piece to attach to the crocheted pieces. Thanks!
hi natalie - you could try artbeads - http://www.artbeads.com/base-metal-wholesale-bulk-chain.html
they have a lot to choose from!
good luck with your present.
Thank you for sharing this great pattern! I wanted to jazz up a boring singlet so I used your pattern as the starting point to put some frills on the neckline. The yarn i used is a Milford Jumbo cotton Perle no. 10 weight in natural. I extended the length of the row to make more scallops and increased the number of rows to 5. It looks fantastic. Thanks again for sharing such a fun little pattern.
Absolutely gorgeous! I linked to it on my blog this morning: http://www.mooglyblog.com/free-ruffle-crochet-patterns/
Thanks so much for sharing this!
Post a Comment